From EncyclopAtys
m (→Old build-in tools: minor correction) |
m (→Old build-in tools: chapter name change) |
||
| Line 22: | Line 22: | ||
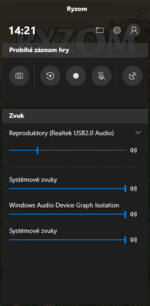
[[File:Gamebar ui.png|thumb|150px|alt=Windows Game Bar interface|Windows Game Bar interface]] | [[File:Gamebar ui.png|thumb|150px|alt=Windows Game Bar interface|Windows Game Bar interface]] | ||
| − | === | + | ===Build-in tools=== |
This way will work with most of recent versions, probably with Windows 98 and newer but might work with Windows 95 as well. First copy the desktop screenshot into your clipboard | This way will work with most of recent versions, probably with Windows 98 and newer but might work with Windows 95 as well. First copy the desktop screenshot into your clipboard | ||
Press '''Print Screen''' key | Press '''Print Screen''' key | ||
Revision as of 22:01, 5 April 2020
The last editing was from Moniq on 5.04.2020.
This document describes ways how to make evidence in form of screenshots or videos. It is mainly helpful and intended for members of the Test Team however it might be useful for for regular users as well, especially when they need to document game issues for a ticket or game forum post. The document is separated into three sections by client platform and, in case of video recording, is not meant as help with live streaming.
The Ryzom client itself contains feature to capture screenshots and this functionality is described in Screenshot help on this wiki.
Windows
Windows 10 has some support for needed features but in case of older version you will probably need to install 3rd part software.
Screenshot
The way how to take a screenshot of your desktop in most of recent versions of Windows consists of two steps. First the screenshot will be copied into the clipboard by pressing the Print Screen (sometimes PrtScn) key on your keyboard. It is located right to F12 key, above the Insert key. Then you need to start an image editor and paste the content of the clipboard in.
Build-in tools
This way will work with most of recent versions, probably with Windows 98 and newer but might work with Windows 95 as well. First copy the desktop screenshot into your clipboard
Press Print Screen key
Then you need to open Microsoft Paint, a simple image editor that is default part of all Windows, and paste the content of your clipboard.
Execute mspaint command (or find application Paint / MS Paint in your Start Menu)
Press Ctrl+V (or right-click in the drawing area and select Paste)
Windows Game Bar
Microsoft Windows 10 has a build-in feature to capture screenshots of you application related to other gamer extensions. It however is not possible to capture the whole desktop and you need to start the application you want to record first.
Press Win+G to display Game Bar and access recording options
Press Win+Alt+Print Screen to take a screenshot
Greenshot
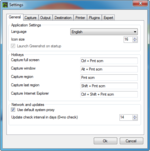
Another option is to use Greenshot, an open source screenshot tool for Windows. Install the application and start it, it will be hidden in the panel notification area along with other icons.
Press Ctrl + Print Screen to capture whole desktop, then save it to a file
The GIMP
GNU Image Manipulation Program, a powerful tool to edit images in various formats. It also have an interface to capture desktop screenshots.
Choose File > Create > Screenshot from the main menu
Video recording
Latest Microsoft Windows 10 includes support for video recording. In case you are using any older version, you will probably need to use 3rd party software to do the job.
Windows Game Bar
Microsoft Windows 10 has a build-in feature to record video of you application related to other gamer extensions. It however is not possible to record the whole desktop and you need to start the application you want to record first.
Press Win+G to display Game Bar and access recording options
Press Win+Alt+R to start or stop video recording
VLC media player
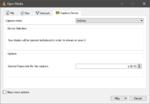
VLC is open-source multimedia player and stream server application that can, along with many other functions, also record your desktop. This recording should work with every version of Windows in case you are able to install and run VLC, however it requires you to perform several steps:
1. Select Media > Convert/Save (or press Ctrl+R)
2. Switch to Capture Device tab
3. Select Desktop from Capture mode drop down menu
4. Set Desired frame rate for the capture using the spin box to at least 15 f/s
5. Click Convert/Save button
6. Select Profile from the drop-down menu (or click preferences button to adjust video output)
7. Select Destination file vlivking on Browse button
8. Click Start button to start recording
9. To stop recording click standard ⏹ (stop) button as if you stop video/audio playback
Linux
Most of end-user Linux distributions come with various tools that can do the job. Some of them are already part of your desktop environment, other can be installed from your distribution package repository. It is not aim of this document to describe all existing utilities
Screenshot
Most of Linux graphical environments have built-in a way how to capture desktop screenshots already. It is usually accessible by pressing the Print Screen (sometimes PrtScn) key on your keyboard. It is located right to F12 key, above the Insert key. In case that your environment does not support this feature, you can use one of many alternatives.
Build-in tools
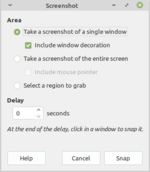
Taking screenshot by pressing Print Screen will work in case you are using Cinnamon, Gnome, KDE Plasma 5, MATE or Xfce desktop. Please consult help (accessible usually by pressing F1 key) for advanced options specific for your desktop environment. These are usually accessible by starting the application alone from menu or as an argument on the command line.
The GIMP
GNU Image Manipulation Program, a powerful tool to edit images in various formats. It also have an interface to capture desktop screenshots.
Choose File > Create > Screenshot from the main menu
ImageMagick
A set of command line driven utilities for image manipulation. Consult the manual page page for more options.
Execute import -window root ~/file_name.png command to take screenshot of your desktop and save it to your home directory.
Video recording
It might be important to record your activity in the game. It can help you to show a problem or describe a client behaviour to others. There exist various ways how to do this.
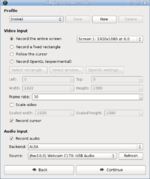
SimpleScreenRecorder
It is a small but powerful tool to record a video of your desktop environment. It is a Qt-based free (libre) software that allows you to specify shortcut to start and stop recording and set many other options.
byzanz
Another option is to use byzanz, a command line utility that will record your desktop as an animated GIF (Graphics Interchange Format) image. Please note that, by default, the record will suffer the format limitations with small colour palette because True color using separated image blocks is not supported. Please consult the manual page for more options and output formats.
Execute byzanz-record ~/file_name.gif to record your desktop and save it to your home directory.
Other tools
There exist some additional tools and utilities that might help to make evidence for your (testing) report.
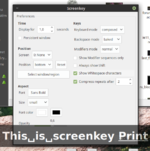
Screenkey
In some special cases it might be needed to also record keys that you press on your keyboard. You can use the this utility in combination with desktop video recording.
macOS
(TODO)


