From EncyclopAtys
m |
(→Occupation Trainers) |
||
| Line 76: | Line 76: | ||
==Occupation Trainers== | ==Occupation Trainers== | ||
There is only one trainer for each occupation. Each capital has the trainers for 2 occupations: one easy occupation and one difficult occupations. The easy occupation mostly involves missions in the local regions, while the difficult occupation sends you into the [[Kitins' Lair]]. | There is only one trainer for each occupation. Each capital has the trainers for 2 occupations: one easy occupation and one difficult occupations. The easy occupation mostly involves missions in the local regions, while the difficult occupation sends you into the [[Kitins' Lair]]. | ||
| − | + | {| class="wikitable" | |
| − | + | |- | |
| − | + | ! Town !! Difficulty !! location!! Map | |
| − | + | |- | |
| − | [[ | + | | rowspan="2"| Fairhaven || [[Water-Carrier]] || Basic || Just outside the main entrance to the city. || rowspan="2"| [[File:Occupations-FH.JPG| 350px| Occupation trainers are located at the big blue dots.]] |
| − | + | |- | |
| − | + | | [[Larvester]] || Advanced || Just outside the southern entrance to the city. | |
| − | + | |- | |
| − | + | | rowspan="2"| Pyr || [[Toolmaker]] || Basic || Inside the Great Forge. || rowspan="2"| [[File:Occupations-pyr.JPG| 350px| Occupation trainers are located at the big blue dots.]] | |
| − | [[ | + | |- |
| − | + | | [[Butcher]] || Advanced || Just inside the city from the southern gate. | |
| − | = | + | |- |
| − | + | | rowspan="2"| Yrkanis || [[Florist]] || Basic || Located in a building just east of the Karavan altar. || rowspan="2"| [[File:Occupations-Yrk.JPG| 350px| Occupation trainers are located at the big blue dots.]] | |
| − | + | |- | |
| − | + | | [[Scrollmaker]] || Advanced || Located just east of the stables. | |
| − | + | |- | |
| − | + | | rowspan="2" | Zora || [[Magnetic Cartographer]] || Basic || Just west of Daïsha Estate. || rowspan="2"| [[File:Occupations-zora.JPG| 350px| Occupation trainers are located at the big blue dots.]] | |
| − | + | |- | |
| − | + | | '''[[Medic]]''' || Advanced || Just south of Daïsha Estate. | |
| − | [[ | + | |} |
=Getting Started= | =Getting Started= | ||
Revision as of 01:29, 18 November 2020
Occupations are a type of job, if you will, you can take. An occupation from what is currently known allows you to create all sorts of items, which mostly aid in helping regenerate an attribute of the player character. At any given time you can not take on more than three occupations and there is a two day cooldown before you can drop an occupation. In the event that you drop an occupation, the experience you had in that occupation will remain should you ever choose to take that occupation on again.
At the moment there are 8 occupations in game, and it seems 4 of them are much easier and take place in the normal regions of the main continents, starting in the lowest-level one and working their way up, while the other 4 are much harder and involve going into the Kitins' Lair right from the start.
- The easy ones are: Florist, Toolmaker, Water-Carrier, and Magnetic Cartographer.
- The hard ones are: Butcher, Medic, Scrollmaker, and Larvester.
Occupations yield certain items which aid regeneration when consumed, among other things. See Occupation Products for the list of items produced by occupations. The individual page for each occupation also has a description of what they produce.
Contents
Known bugs, issues and workarounds
As occupations were just recently introduced, there are still some issues surrounding them. Current known bugs include:
- Toolmaker: The mission descriptions are lacking a number of "or", so that it seems like you need to do every task in the list while in fact you only need to do either of the tasks.
- Scrollmaker: Mission 1 of grade 1 asks for the same larva that are needed for mission 1 of the Larvester occupation, while scrollmaker is supposed to ask for different larva.
- Medic: One of the NPCs you're sent to treat may be dead; right-clicking his corpse and selecting the option to treat him still allows you to complete the mission. One of the Ranger NPC's may also be missing after being dead for some time. The bandages mission will then be bugged when the random target is selected, either when taking the mission, or completing a component of the mission, if the target is the missing NPC. The only work around currently is to abandon the mission and retake until you receive a NPC target that is not missing.
Quick Overview
Here's the main summary of the occupations to give you a rough idea of their differences:
| Occupation: | Takes places mostly in: | Main Activities: | Product improves: |
| Water-Carrier | Aeden Aqueous | Running around | Life and sap regeneration |
| Magnetic Cartographer | Witherings | Running around | Life and stamina regeneration |
| Florist | Verdant Heights | Foraging and running around | Sap regeneration |
| Toolmaker | Anywhere you prefer | Hunting, foraging and crafting | Stamina regeneration |
| Butcher | Burning Desert and Kitins' Lair | Killing stuff | Life Regeneration |
| Medic | Kitins' Lair | Running Around | Life Regeneration |
| Larvester | Kitins' Lair | Foraging | Focus Regeneration |
| Scrollmaker | Kitins' Lair | Foraging and running around | Craft success |
For more details, see the individual page of each occupation. Also see Occupation Produce and Recommended Combinations.
Occupation Trainers
There is only one trainer for each occupation. Each capital has the trainers for 2 occupations: one easy occupation and one difficult occupations. The easy occupation mostly involves missions in the local regions, while the difficult occupation sends you into the Kitins' Lair.
| Town | Difficulty | location | Map | |
|---|---|---|---|---|
| Fairhaven | Water-Carrier | Basic | Just outside the main entrance to the city. | 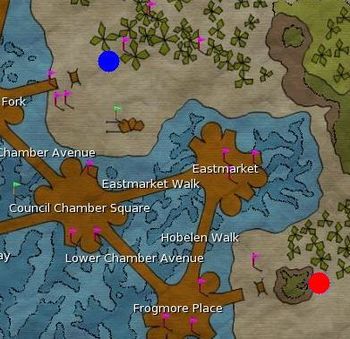
|
| Larvester | Advanced | Just outside the southern entrance to the city. | ||
| Pyr | Toolmaker | Basic | Inside the Great Forge. | 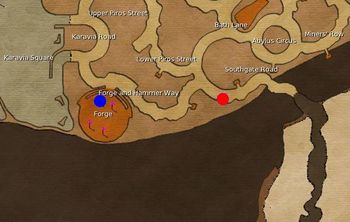
|
| Butcher | Advanced | Just inside the city from the southern gate. | ||
| Yrkanis | Florist | Basic | Located in a building just east of the Karavan altar. | 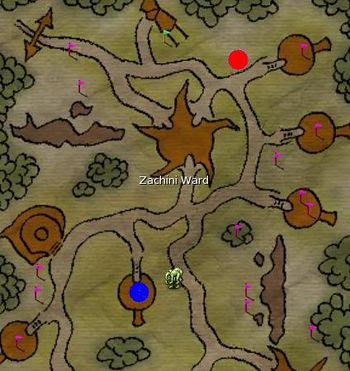
|
| Scrollmaker | Advanced | Located just east of the stables. | ||
| Zora | Magnetic Cartographer | Basic | Just west of Daïsha Estate. | 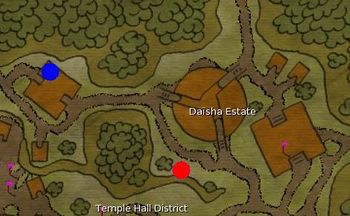
|
| Medic | Advanced | Just south of Daïsha Estate. |
Getting Started
This section will address the basics to get you started in your chosen occupation. As an example, we'll use the Water-Carrier occupation, but the concepts we'll discuss apply to all occupations. Remember to use this guide sparingly; half the fun is in figuring it out yourself.
First, you need to choose an occupation. Read up a bit about the different occupations here on the wiki or in the ingame guide, which can be found by opening the API-window (shift-W by default) and going to the "Occupations" section. Once you've decided, find the master for your chosen occupation using the maps included on this page.
Words of Warning
Two things to know about occupations before you start:
- You can only have a maximum of 3 occupations, and there's a 2-day cooldown between taking an occupation and being able to drop it to make space for another.
- If you advance to the next Grade (explained later) you get more difficult missions, and can no longer do the missions from the previous grade. Make sure you are ready for the more difficult missions before advancing! You can however do the lower grades with higher grade components. For example you can do grade 1 with grade 6 components, also the recipe for grade 1 will still be the same regardless of using higher grade components.
Basic Concepts
Now that you know about the common pitfalls, let's look at the basic outlines of how occupations work.
- Components: The core of every occupation revolves around gathering two different component items, unique to that occupation. You need several of both component items in order to produce the main products of the occupation. Every occupation has two separate 'gathering' missions, one for each component, that you must perform to acquire those components.
- Practising your occupation: This is the process by which you turn the component items into products. (Basically the 'crafting' part of the occupation, but that term is generally avoided to prevent confusion with actual crafting.) Every occupation has a specific mission to do this; the 'crafting' mission of the occupation, so to speak.
- Grades: Grades are a measure of how good you are in an occupation. You start at grade 1, and can become better through practising the occupation. If you reach a higher grade, you'll be given more difficult 'gathering' missions, which will reward you with higher grade components, which in turn can make more powerful products.
- Upgrading: Every grade has both basic components and upgraded components. The 'gathering' missions will give you the basic components, and upgrading is the process whereby you turn these into upgraded components. This usually takes several basic components for each upgraded component. Practising your occupation with upgraded components instead of basic ones gives better products.
- Special Items: Every occupation has it's own special item, and practising an occupation allows you to get that occupation's special item once every 2 days. This doesn't require you to do anything else than ask the master of the occupation for it. The use of the special item depends on the occupation.
The occupation master
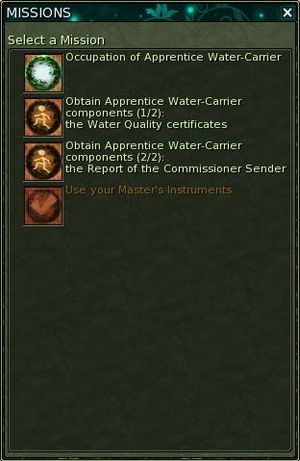
Now you're ready to talk to the occupation master of your choice. This master will offer you four missions, displayed on the image to the right.
The first mission will be the only one that's available when you first talk to the master. This is the one you take to become a practitioner of that occupation. (Water-Carrier in this image.) Once you're already a practitioner of the occupation, you can take the same mission again every 2 days and it'll offer you three options:
- Receive more of the Special Item of the occupation. What this item is depends on the occupation
- Drop the occupation to make room to learn another.
- Never mind. This cancels the mission without doing anything.
If you pick an option, the mission will then become unavailable again for 2 days (unless you pick the "never mind" option).
The second and the third mission are the main 'gathering' missions for your occupation. These are the missions you have to do to get the two different components to practice your occupation with. Both these missions are an "on-going" mission involving 4 different tasks: Once you take the mission, you will randomly be assigned one of the 4 tasks of that mission. If you complete that task, you'll receive a component, and will again randomly be assigned one of the 4 tasks (which may be the same task again). This will go on while the mission is active, and the mission will only stop if you abandon it.
For Water-Carrier, for example, the 4 tasks for the first gathering mission are 4 different locations to get water from, and the 4 tasks for the second gathering mission are 4 different NPCs to bring water to. For other occupations, the 4 tasks may be completely different, but the gathering missions always involve 4 tasks on continuous random shuffle. Note that you can always abandon the mission and retake it to get a new random task, as many times as you like.
The fourth mission in the menu is for later on in the occupation, so we'll not bother with that for now.
The occupation workbench
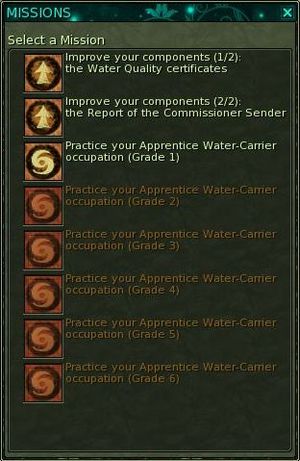
Somewhere close by the master of the occupation is the workbench for the occupation. It's different for each occupation, but usually easy enough to recognise. You have to be a practitioner of the occupation to use the workbench. It will offer you 8 missions, displayed on the image to the right.
The first two missions are for upgrading the two different components of your occupation. With upgraded components you can create better items. At grade 1, doing the 'gathering' tasks described above will give you basic Q10 components. These can be turned into upgraded Q15 components. To do this, take the mission to upgrade a particular component (the first mission for the first component and the second mission for the second component), and hand 4 of the basic Q10 components over to the workbench.
Beware that upgrading has only a certain chance of success, and if it fails, you will lose 2 of the 4 components you just handed over. If the upgrading succeeds, you will get 2 upgraded components out of 4 basic components. Upgraded components will be further discussed in the advanced section.
The actual creating of items
The next six missions in the menu are for actually practising your occupation and thus creating items. At first only the first one will be available. The other 5 will open up as you reach higher grades in the occupation. To start creating items in the occupation, take that first 'crafting' mission (the third mission in the list). Once you take it, a 5 minute time starts. All the following actions have to be done within those 5 minutes or the mission will fail.
First, the mission will ask you if you want to use basic or upgraded components. We'll assume for now you'll choose basic components; upgraded components will be discussed later on. You'll then be asked to hand over 4 of each of the two basic components of your occupation. If you do not have these in your inventory, the mission will be cancelled.
Recipes
Once you've handed over the necessary components, you'll be asked to choose a "recipe". This recipe basically comes down to making 5 choices in a row, each between 7 options. The combination of options you choose will affect the "yield" of the creation. The yield ranges between 30% and 100% and a higher yield means you will create more items. For example, a yield of 40% may give you 6 items while a yield of 60% will give you 9 items. The items created will be the same, the yield only determines how many of them you receive.
There is no way to know which combination will give a good result, except asking someone else who's done the same occupation. You can't experiment until you find a good combination either. You only see how good the combination you've chosen is when the creating is already done, and then there's no changing it anymore. So just pick options randomly and see what you get. Don't worry if you get a bad combination the first time, this is just to see how it works. And you'll always get at least a few items even with the worst possible combinations.
Gaining experience
Once you're done choosing a recipe, you will be told how many items you created. You'll then be asked whether you want to keep the items, or to hand them in for experience. You will only receive experience in your occupation if you hand items in, but handing them in means you won't actually receive any items to use. So choose carefully if you'd like to receive items now or gather experience to create better items later. If you choose to hand them, you'll receive 1 point of experience for each item you had created. Making this choice is the final step of the mission; once you choose the mission will be completed.
Final notes
Lastly, the 'crafting' mission can only be taken once every 20 hours. Once you've completed it, you will receive either your items or your experience, and a 20 hour cooldown will be started before you can take the mission again.
If the 5 minute timer ends before you complete the mission, the mission will fail. The 20 hour cooldown will also be started, and if you had already turned in components, those will be lost.
Advanced Concepts
The Recipe Book
The first time you're asked for a recipe, you just randomly pick a series of options and hope for the best. If you continue practising your occupation however, you'll want to start trying different combinations and looking for the best recipes. To help you with this, you have an automatic recipe book. Every recipe you try and see the result for is automatically added into this recipe book.
Your recipe book is accessed by opening the ingame web-application window (mapped to shift-W by default) and going to the "Occupations" section. This section contains your "Saved Recipes" for each occupation. Selecting an occupation will by default only show you the best recipe you've so far found for that occupation, but you can click "Display all recipes" to show you all recipes you've found for it.
Note that the recipe book will show you the combinations you've chosen and the resulting yield in %, but not the number of items this yield produces. A higher yield is always better for the number of items, though.
All your recipe book does for you is show you all combinations you've already tried. When you're still trying new recipes, it does not automatically stop you from accidentally trying a recipe you've already tried again. Nor can it automatically enter in the best recipe you've found when you've decided to only use that anymore. You still have to look in your recipe book yourself and enter in the combination manually whenever you practise your occupation.
The recipe book is tied to your character, not your account. Thus it will only show the recipes you've used on your current character. Recipes used by another character on the same account will show up in that character's recipe book.
Special Items
As said earlier, each occupation has it's own special item that you may receive every 2 days if you have the occupation.
For the 4 harder occupations (Butcher, Medic, Scrollmaker, and Larvester), this special item is a teleporter pact to Almati Wood. For the 4 easier occupations, this item is something that helps with occupations itself.
Three of these items help with upgrading components.
- Florist gives you Lucky Flowers. You can chose to use up a lucky flower when you start an upgrade action to increase your chances of succeeding in the upgrading.
- Magnetic Cartographer gives you Amber of Protection. You can chose to use up an amber of protection when you fail an upgrade action to prevent the loss of 2 basic components.
- Water-Carrier gives you Stimulating Water. You can chose to use up a stimulating water when you succeed an upgrade action to get 4 upgraded components instead of 2.
The fourth items helps with actually practising your occupation: The Improved Tool, from the Toolmaker occupation. You can chose to use up an improved tool when you start practising your occupation with basic components to give you +10% yield on that item creation. This only works if you practise with basic components, the improved tool cannot be used to improve the yield if upgraded components are used.
Practising with upgraded components
When you start a mission to practise your occupation, you'll first be asked if you want to use basic or upgraded components. We've already discussed using basic components. Using upgraded components is largely the same, but has a few important differences.
If you choose to practise your occupation with upgraded components, you'll be asked to hand over 4 of each of the two upgraded components of your occupation. Again if you do not have these in your inventory, the mission will be cancelled. The rest of the process will go exactly the same as with basic components, and the recipes will give the same yield as they would've with basic components. It's the end-result that is different: With upgraded practising, the same yield in % gives you a higher number of actual items created.
Another important difference with upgraded components is that once the recipe is completed, you'll get the options to either hand the created items in for experience, or to hand half of them in for experience and keep the other half. There is no option to keep all of them. (And with basic practising, there is no option to turn in half.) You will still only receive 1 point of experience for each item handed in.
If you choose the second option though, the items you'll receive will be one grade higher than the items created with basic components. So, the items created with upgraded components at grade 1 will be the same as the items created with basic components at grade 2, and so on.
Advancing in grades
There are 6 grades to every occupation. Everybody starts out at grade 1, but by practising your occupation and handing in the created items for experience, you can eventually reach the higher grades. Being a higher grade means you will be assigned more difficult gathering tasks, but you'll also be able to create more powerful regenerative items.
Beware that once you advantage to the next grade, your gathering missions will automatically be upgraded to reflect your higher grade. There is no way to still do the easier gathering missions of the lower grade, or to go back to being a lower grade. If your gathering missions involve turning in items, any items you haven't turned in yet could also become useless if you advance to the next grade. So make sure you are ready for the more difficult gathering missions of the next grade before you advance!
To advance to the next grade, you first need to fill up your experience bar. For the first grade, this requires 30 experience. As soon as you reach the 30 experience points, you can advance to grade 2, but there is a catch: The practise mission that brings you to 30 experience must be completed with a yield of at least 60% (exactly 60% is enough). The +10% from an improved tool does not count in this.
If the yield of the items handed in was less than 60%, you'll be stuck at 30 experience and any more products you hand in will be wasted, until you hand in products created with a yield of at least 60%. Once a yield of 60% pushes you over the 30 experience, you'll be told to talk to your occupation master, who will advance you to the grade.
Being grade 2
A number of things change when you advance to the next grade. For one, the next grade mission to practise your occupation will become available. This mission requires higher grade components to complete, but will give higher grade, more powerful products.
The creation mission of your previous grade will also still be available to you. If you have any lower grade components left, you can still use them on this mission. Once you run out, you can also use the higher grade components on this mission. You cannot hand these lower grade products in for experience anymore though. If you are grade 2, only the grade 2 creation mission can gain you experience when you turn the products in.
You cannot obtain more of the lower level components anymore though, save through trade. As soon as you advance to the next grade, your gathering missions will alter to reflect the higher grade. You'll be given more difficult tasks that will reward you with the higher grade components. There is no way to do the easier tasks for lower level components anymore.
Also, the recipes you've learned for grade 1 don't apply anymore to grade 2 item creation. Every grade has it's own different good and bad combinations, so you'll have to start over in discovering recipes. The grade 2 recipes you try will be stored in your recipe book separate from the grade 1 recipes. You can ofcourse still use your grade 1 recipes for the grade 1 crafting mission, when you still want to do that one.
Master's Instruments
Master's Instruments are a special occupation item that is sometimes handed out as event rewards. These items can be handed in to an occupation master to receive a direct boost to your experience in that occupation. Master's Instruments have to be handed in 3 at a time, and seem to give you 1 point of experience per item handed in (so 3 in total per hand-in).
You hand in Master's Instruments by talking to your occupation master and taking the fourth mission offered to you, the one called "Use you Master's Instruments".
Further information
Wiki:
- List of items provided by occupations.
- Spoilers on occupations, like recipes.
- spoiler on the forum TURNING A PROFIT FROM GRADE 1 WATER-CARRIER IN ONLY 758 EASY STEPS!
External:
- A beginner's guide to occupations, including free 60% recipes.
- An advanced guide to finding occupation recipes.


