From EncyclopAtys
m (→Actions Bar: add Actions and Upgrades) |
m (→Keys) |
||
| (23 intermediate revisions by one other user not shown) | |||
| Line 3: | Line 3: | ||
|FR=Utilisateur:Amosys/Brouillons/Manuel de l'utilisateur/Ch 2 - Contrôles de l'interface utilisateur|RU=}} | |FR=Utilisateur:Amosys/Brouillons/Manuel de l'utilisateur/Ch 2 - Contrôles de l'interface utilisateur|RU=}} | ||
Original article (french more updated) | Original article (french more updated) | ||
| + | {{Template:User Manual v4}} | ||
| + | {{Template:User Manual v4 Part 2}} | ||
<big>Bars, windows and Controls on the User Interface</big> | <big>Bars, windows and Controls on the User Interface</big> | ||
[[File:UIpreview first screen.png|thumb|center|link=[[User:Amosys/Draft/User_Manual/Part_2_-_Basic_presentation|To the basics]]]] | [[File:UIpreview first screen.png|thumb|center|link=[[User:Amosys/Draft/User_Manual/Part_2_-_Basic_presentation|To the basics]]]] | ||
=Common features= | =Common features= | ||
| − | + | Ryzom allows you to configure the screens very differently, to customize keyboard shortcuts... There are also several ways to open the same object. | |
| + | |||
| + | For the interface (Ryzom has been around for a long time), several main principles can be distinguished: | ||
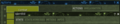
| + | * objects with transparent edges: the compass, chat, Inventory (I), various toolbars [[File:Task-bar Hori small 2019-06-07.png|A smaller taskbar]]... | ||
| + | * all windows with a floral border, with an X in the upper right corner to close and ᐅ ᐁ to reduce to the title (private tell, Public bulletin board/Forum, Web Hosting, izam/email, notepad...) | ||
| + | * "Between two" and/or specials: such as Actions B (no ᐅ ᐁ), Missions (J for its 3 layouts) or other recent additions: the Dynamic Events of the map, artifact of Teleportation Kami/Karavan... | ||
| + | |||
| + | <gallery> | ||
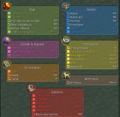
| + | FR top windows B and P 2019-06-09.png|Two windows (B and P), with floral pattern, with X to close | ||
| + | FR f1 fenetres 2019-06-08.png|Apparaît en maintenant F1 enfoncée, pour ajouter une 2e barre de mains: en haut à droite | ||
| + | FR network fenetre gd 2019-06-08.png|Too big? (show Network status, in French) | ||
| + | FR network fenetre 2 2019-06-08.png|The same, reduced | ||
| + | </gallery> | ||
Common right-click functions are Window Opacity, Lock/Unlock, Help. | Common right-click functions are Window Opacity, Lock/Unlock, Help. | ||
| Line 14: | Line 28: | ||
*Help is for instructions. | *Help is for instructions. | ||
| + | Many windows can be re-sized and repositioned using the mouse. | ||
| + | |||
| + | <gallery> | ||
| + | Forum reduit 2019-06-09.png|A very reduced Forum window | ||
| + | Forum ouvert 2019-06-09.png|Normal Forum window | ||
| + | </gallery> | ||
| − | [[File:Task- | + | ==The new features== |
| + | * The '''WebApps''' and '''Task''' toolbars both have a new tool [[File:Task-bar_Window_tool_2019-06-07.png|this new window tool usages in images]], we now have the choice between [https://en.wiki.ryzom.com/wiki/File:Task-bar_Window_tool_2019-06-07.png 4 layouts] . | ||
| + | * Improvement of the hand bars (in the past, Hands 2 was necessarily vertical). | ||
| + | * easier team invitation/guild, improved inventory filters, we love your eyes | ||
| + | * Dynamic Events on the map, artifact of Teleportation Kami/Karavan... | ||
| + | |||
| + | <gallery> | ||
| + | Contact list ex 2019-06-07.png|New tool in Friends list (to invite) | ||
| + | Deux barres de mains hor 2019-06-08.png|the 2nd hand horizontal | ||
| + | EN I Dappers and filters 2019-06-14.png|a filter in Inventories | ||
| + | </gallery> | ||
| − | |||
| − | |||
| − | + | ==Show/hide tools and move them== | |
<gallery> | <gallery> | ||
Mooving chat window 2019-06-07.png|On chat window, search to get the border then drag | Mooving chat window 2019-06-07.png|On chat window, search to get the border then drag | ||
| Line 27: | Line 55: | ||
</gallery> | </gallery> | ||
| − | =Keys= | + | To hide/Monitor a window or toolbar, the easiest way is to use the keyboard shortcuts F1 to F4 or the keyboard shortcuts (K key). By holding down the F1 key (F3 if you are on desktop 3), you open the following window. |
| + | {{read more|User Manual/Part 2 - The 4 desktops}} | ||
| + | |||
| + | There's many way of customize Ryzom interface. Let's start by some keyboard shortcuts and interface presentation. | ||
| + | |||
| + | == The 4 desktops, hide windows == | ||
| + | Depending on what you do, you're going to want to organize and customize your windows and toolbars differently. The opacity, size and place of the toolbars and windows will be saved for each desktop, but keyboard shortcuts ('''K'''), language and configuration ('''U''') are global (for the 4 desktops). | ||
| + | |||
| + | [[File:EN F1 key held down 2019-06-14.png|thumb|left|Tools and windows of the current screen]] | ||
| + | You can use 4 different desktops, by default the shortcuts are F1 to F4 (see below how change the shortcuts). <br /> | ||
| + | The default is number 1, you can add/hide toolbars and a lot of windows by pressing F1 (hold down the key F1 to open this window) - it shows too the '''name of toolbars''' and main '''keyboard shortcuts'''. | ||
| + | |||
| + | Here are the main keyboard shortcuts:<br /> | ||
| + | • '''F1''', '''F2''', '''F3''' and '''F4''': switch on one of your 4 screens (desktops), holding down the Fx key displays the configuration of the screen x (x=1 to 4).<br /> | ||
| + | • Status: Identity ('''P'''), Journal of Mission ('''J'''), Encyclopedia ('''Shift+E''')<br /> | ||
| + | • Actions & inventory: '''I'''nventory (I), action progression ('''B''') <br /> | ||
| + | • Communication: fame ('''Shift+f'''), web ('''Shift+W'''), '''F'''riends <br /> | ||
| + | • '''M'''ap, Team ('''T'''), and on main land: Guild ('''G'''), '''Shift+P''' (as Pet). '''K'''eybindings <br /> | ||
| + | |||
| + | {{read more|User Manual/Part 2 - The 4 desktops}} | ||
| + | {{clear}} | ||
| + | |||
| + | ==Keys== | ||
| + | [[File:KeysConf.jpg|thumb|right|K key held down]] | ||
The function keys perform valuable functions in Ryzom. | The function keys perform valuable functions in Ryzom. | ||
A full list can be viewed by pressing the K key to display the KEYS window. | A full list can be viewed by pressing the K key to display the KEYS window. | ||
All keys can be reassigned, but be careful. | All keys can be reassigned, but be careful. | ||
| + | |||
Some useful keys are: | Some useful keys are: | ||
| − | |||
*F6 Toggle combat (disengage enemy) | *F6 Toggle combat (disengage enemy) | ||
*F10 Target self | *F10 Target self | ||
*F12 No Target | *F12 No Target | ||
| − | |||
*By pressing the space bar, the nearest enemy will be targeted as Front Selection Enemies. | *By pressing the space bar, the nearest enemy will be targeted as Front Selection Enemies. | ||
| − | * | + | * SHIFT+P Animals ([[Zig]]s and [[Mektoub FAQ|mektoub]]s) |
| − | You can change your camera view distance by using the wheel on a mouse or using the keys shown in the Keys menu. | + | You can change your camera view distance by using the wheel on a mouse or using the keys shown in the Keys menu. Macros can use them too. |
You can toggle to first-person viewpoint and back using the V key. | You can toggle to first-person viewpoint and back using the V key. | ||
| − | Some things are easier to see at different view distances, such as conversation bubbles or harvesting sources. | + | Some things are easier to see at different view distances, such as conversation bubbles or harvesting sources. |
| − | |||
| − | |||
<gallery> | <gallery> | ||
EN F1 key held down 2019-06-14.png|F1 key held down (F2, F3, F4) to customize the Desktop 1 (resp. 2, 3, 4) | EN F1 key held down 2019-06-14.png|F1 key held down (F2, F3, F4) to customize the Desktop 1 (resp. 2, 3, 4) | ||
KeysConf.jpg|K key held down: change the shortcuts | KeysConf.jpg|K key held down: change the shortcuts | ||
| − | |||
| − | |||
| − | |||
| − | |||
</gallery> | </gallery> | ||
| − | From [[Patch 2019#Jena Year 2602 Patch v3.5.0|JY 2602]] | + | == We love your eyes == |
| + | Not only out of greed :) | ||
| + | |||
| + | Do you have a small screen (13 inches) or are your eyes tired? This paragraph is for you | ||
| + | |||
| + | * From '''UI-Scale for all Clients''' [[Patch 2019#Jena Year 2602 Patch v3.5.0|JY 2602]] patch, one of the big improvements is hidden in the System menu (System / Configuration / Graphics / General), with the interface scale - it goes from 0.80 to 2.00. | ||
<gallery> | <gallery> | ||
Ech 1.5 2019-02-09.png|A big 1.50 | Ech 1.5 2019-02-09.png|A big 1.50 | ||
| Line 62: | Line 111: | ||
Ech1 2019-02-09.png|'''Normal value''' at 1.00 | Ech1 2019-02-09.png|'''Normal value''' at 1.00 | ||
Ech 0.95 2019-02-09.png|Smaller at 0.95 | Ech 0.95 2019-02-09.png|Smaller at 0.95 | ||
| + | </gallery> | ||
| + | * Also look at the size in the chat (System menu). This concerns the display size and not the size when entering. | ||
| + | * Did you know you have [[User Manual/Part 2 - The 4 desktops|four desks to organize your windows]]? Or that you can use many apps ([[Chat/RC FAQ|chat]], forum, [[Webapps main|webapps]]) outside the game, using a web browser or your [[Webapps main#from a cell or tablet|smartphone]] ? | ||
| + | <gallery> | ||
| + | EN f1 2019-06-14 800px.png|F1 with 2 Hands toolbars, opaque chat | ||
| + | EN F2 2019-06-14 800px.png|F2 to craft: 3 I windows, chat on top | ||
</gallery> | </gallery> | ||
| Line 75: | Line 130: | ||
<div style="overflow: hidden"> | <div style="overflow: hidden"> | ||
=Compass= | =Compass= | ||
| − | + | The right-click functions of the compass will target a particular item or location that you want. <br /> | |
| − | The right-click functions of the compass will target a particular item or location that you want. | + | |
For example to find an animal, select Animals>Mount 1 to find your mektoub. | For example to find an animal, select Animals>Mount 1 to find your mektoub. | ||
| − | Or, to find a team member, select Team>Name and the compass will point in their direction. | + | Or, to find a team member, select Team>Name and the compass will point in their direction, with the distance displayed below. |
On the radar, welcomers and other stationary NPCs show a tiny dialog bubble instead of a dot. | On the radar, welcomers and other stationary NPCs show a tiny dialog bubble instead of a dot. | ||
When searching for an NPC individual in the wild, look to the compass to aide your search. | When searching for an NPC individual in the wild, look to the compass to aide your search. | ||
| − | Instead of a dot, a small scroll will appear over the head of an NPC that can give or receive missions. | + | Instead of a dot, a small scroll will appear over the head of an NPC that can give or receive missions. <br /> |
| + | |||
In any chat window, type /target ''name'' and if it doesn't say “entity not found” then selecting Target after right-clicking in the compass will target the named individual. | In any chat window, type /target ''name'' and if it doesn't say “entity not found” then selecting Target after right-clicking in the compass will target the named individual. | ||
| − | The compass will point to that avatar or NPC in the visible area up to about 50M, but may not work for NPCs in buildings. | + | The compass will point to that avatar or NPC in the visible area up to about 50M, but may not work for NPCs or homins '''in buildings'''. |
Occasionally, an email icon or a blue Forum icon will appear. | Occasionally, an email icon or a blue Forum icon will appear. | ||
Merely click it (or shift+w > Mail, or > Forums) and then in the top line of text find New posts and click that. | Merely click it (or shift+w > Mail, or > Forums) and then in the top line of text find New posts and click that. | ||
You can now read the new messages. | You can now read the new messages. | ||
| + | |||
| + | Custom configuration: | ||
| + | * If you need to add the IRL hour <ref>The hour on map is [[Time|Atys time]] (not IRL).</ref> on compass: on task bar, menu system, configuration, then on left, under interface/HUD: clic show Clock in Compass. You can add it on chat under interface/chat | ||
| + | |||
| + | <gallery> | ||
| + | EN Compass right clic menu 2019-06-07.png|right clic menu on compass | ||
| + | EN Toub on compas and map 2019-06-07.png|A mektoub on map (M) and on the compass: 14m | ||
| + | Compas 25m 2019-06-07.png|25m in town: forage spot in green, guards in grey (NPC) | ||
| + | Compass 125m 2019-06-07.png|125m in town: mission "scroll" icons, bubbles, '''orange''' | ||
| + | FR forum ouvert et compas 2019-06-09.png|a blue icon that draws attention to your Forum tracking/watching list (8) | ||
| + | </gallery> | ||
</div> | </div> | ||
<div style="overflow: hidden"> | <div style="overflow: hidden"> | ||
| + | |||
= Chat= | = Chat= | ||
[[File:Chat.jpg|200px|thumb|left|Chat window]] | [[File:Chat.jpg|200px|thumb|left|Chat window]] | ||
| Line 438: | Line 506: | ||
However, the price in skill points will change to reflect the value of only the "bricks" or "stanzas" that you do not yet own. It is not possible to "waste" skill points; once you have all "bricks" for a certain action, it will be removed from the trainer. | However, the price in skill points will change to reflect the value of only the "bricks" or "stanzas" that you do not yet own. It is not possible to "waste" skill points; once you have all "bricks" for a certain action, it will be removed from the trainer. | ||
| + | |||
| + | |||
| + | ==Pop-ups== | ||
| + | ===Looting Window=== | ||
| + | [[File:Loot.jpg|200px|thumb|rigntt|Loot]] | ||
| + | [[File:Quarter.jpg|200px|thumb|left|Quarter]] | ||
| + | After making a kill, an option will appear on the cursor when moused-overit. | ||
| + | That message will either say Loot for a primitive or Quarter for a MOB. | ||
| + | A small Quartered Materials window will appear with the booty from this kill which will vary each time. | ||
| + | Individual items may be selected by clicking each item with the mouse, then selecting Drop All. | ||
| + | The entire booty may be collected by clicking Take All. | ||
| + | </div> | ||
| + | <div style="overflow: hidden"> | ||
| + | ===Forage Window=== | ||
| + | [[File:Forage.jpg|200px|thumb|left|Forage]] | ||
| + | After starting an extraction, a forage window will appear on the desktop. | ||
| + | It will show the item foraged, and the quantity and quality of that item. | ||
| + | When the extraction is complete the choices Take All and Drop All may be selected. | ||
| + | Drop All may be selected at any time to abort the extraction. | ||
| + | These windows may appear at other times as well, such as when an NPC offers you a reward. | ||
| + | </div> | ||
| + | ===Warning Icons=== | ||
| + | Small warning icons will appear on the screen to alert you of any spell, catalyzer, or death penalty that affects you. | ||
| + | A larger skull & crossbones image will appear if an owned mektoub dies. | ||
| + | It will inform you how much time remains to collect your possessions from the mektoub before it decomposes. | ||
| + | Hovering the mouse over the icon will give more information about the function and status of that icon. | ||
| + | ===Outpost Battle Window=== | ||
| + | When entering the area of a disputed outpost, a window will briefly open to alert the player to this situation. | ||
| + | The player will either pick ATTACK, DEFEND. | ||
| + | If neither is selected, the avatar will not be tagged, and remains neutral. | ||
| + | Neutral observers cannot be attacked and cannot heal during battle. | ||
| + | They must stay as neutral observers and may be asked to move if they affect things. | ||
| + | |||
-------------------------------- | -------------------------------- | ||
Latest revision as of 02:51, 23 February 2021
The last editing was from Craftjenn on 23.02.2021.
Original article (french more updated)
To the v3 User Manual and de l'utilisateur v3 FR
Part 1 Install the game (with updates resume) • Create an Account and Avatar • Free to Subscribe and Steam • contact support (see An issue to log in?, I need to change my email...)
Part 2 Basic presentation • Advanced Controls on the User Interface (Keys, P I B J M, Avatar Gauges, Compass, Chat (Special command), Target Reticle, Pop-ups, Windows and toolbars) • Use the map • Missions, quest and rites • Store (Mount and Mektoubs, Apartments, Merchants) • Apps (in game, Webapps and API key) • Macros
Part 3 Chat and emotes (Chat, Emotes) • Coma/Death and penalties • Teleportation • Skills (Foraging, Crafting, Fighting) • Guilds and Outpost • Mobs • Common Acronyms and Abbreviations • contact Event Team
Part 4 Credits • GNU Free Documentation License
To the v3 User Manual and de l'utilisateur v3 FR
- Basic presentation (and FAQ, Actions, Pop-ups)
- and Advanced User:Amosys/Draft/User Manual/Part 2 - Controls on the User Interface :
Common features, new features, Keys, Avatar Gauges, Compass, Chat, Target Reticle, Target Window: P I B J M and Actions and Upgrades moved in here, as Pop-ups, The 4 desktops, hide windows)
- translated fastly User Manual/Enchanting weapons thanks to read
- Use the map
- User:Amosys/Draft/User Manual/Part 2 - Missions (with link to User Manual/Quest and Rites),
- Store (User:Amosys/Draft/User Manual/Part 2 - Store/Mount and Mektoubs, User:Amosys/Draft/User Manual/Part 2 - Store/Apartments, User:Amosys/Draft/User Manual/Part 2 - Store/Merchants),
- Apps, User:Amosys/Draft/User Manual/Part 2 - Macros (has 3 links: Invisible mount, Patch 2019#JY 2603 patch + Macros from January 2010)
Actions Bar v3 = Hands
Bars, windows and Controls on the User Interface

Contents
Common features
Ryzom allows you to configure the screens very differently, to customize keyboard shortcuts... There are also several ways to open the same object.
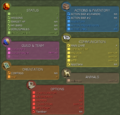
For the interface (Ryzom has been around for a long time), several main principles can be distinguished:
- objects with transparent edges: the compass, chat, Inventory (I), various toolbars
 ...
... - all windows with a floral border, with an X in the upper right corner to close and ᐅ ᐁ to reduce to the title (private tell, Public bulletin board/Forum, Web Hosting, izam/email, notepad...)
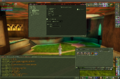
- "Between two" and/or specials: such as Actions B (no ᐅ ᐁ), Missions (J for its 3 layouts) or other recent additions: the Dynamic Events of the map, artifact of Teleportation Kami/Karavan...
Two windows (B and P), with floral pattern, with X to close
Apparaît en maintenant F1 enfoncée, pour ajouter une 2e barre de mains: en haut à droite
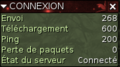
Too big? (show Network status, in French)

The same, reduced


Common right-click functions are Window Opacity, Lock/Unlock, Help.
- Window Opacity controls the background opacity of the windows to allow for a see-through “Heads-Up” display or an opaque easy-to-read window.
- Lock/Unlock controls the movability of the window.
- Help is for instructions.
Many windows can be re-sized and repositioned using the mouse.

A very reduced Forum window

Normal Forum window
The new features
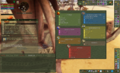
- The WebApps and Task toolbars both have a new tool
 , we now have the choice between 4 layouts .
 - Improvement of the hand bars (in the past, Hands 2 was necessarily vertical).
- easier team invitation/guild, improved inventory filters, we love your eyes
- Dynamic Events on the map, artifact of Teleportation Kami/Karavan...
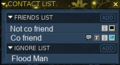
New tool in Friends list (to invite)
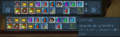
the 2nd hand horizontal

a filter in Inventories

Show/hide tools and move them

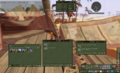
On chat window, search to get the border then drag

If the border don't display, on the chat windows border, then try to unlock (image after)
Right clic on empy space (right of the last channel name) will open a menu to Unlock it
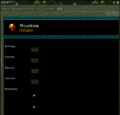
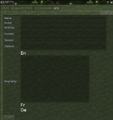
To hide/Monitor a window or toolbar, the easiest way is to use the keyboard shortcuts F1 to F4 or the keyboard shortcuts (K key). By holding down the F1 key (F3 if you are on desktop 3), you open the following window.
There's many way of customize Ryzom interface. Let's start by some keyboard shortcuts and interface presentation.
The 4 desktops, hide windows
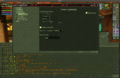
Depending on what you do, you're going to want to organize and customize your windows and toolbars differently. The opacity, size and place of the toolbars and windows will be saved for each desktop, but keyboard shortcuts (K), language and configuration (U) are global (for the 4 desktops).

You can use 4 different desktops, by default the shortcuts are F1 to F4 (see below how change the shortcuts).
The default is number 1, you can add/hide toolbars and a lot of windows by pressing F1 (hold down the key F1 to open this window) - it shows too the name of toolbars and main keyboard shortcuts.
Here are the main keyboard shortcuts:
• F1, F2, F3 and F4: switch on one of your 4 screens (desktops), holding down the Fx key displays the configuration of the screen x (x=1 to 4).
• Status: Identity (P), Journal of Mission (J), Encyclopedia (Shift+E)
• Actions & inventory: Inventory (I), action progression (B)
• Communication: fame (Shift+f), web (Shift+W), Friends
• Map, Team (T), and on main land: Guild (G), Shift+P (as Pet). Keybindings
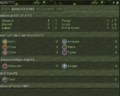
Keys

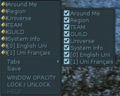
The function keys perform valuable functions in Ryzom. A full list can be viewed by pressing the K key to display the KEYS window. All keys can be reassigned, but be careful.
Some useful keys are:
- F6 Toggle combat (disengage enemy)
- F10 Target self
- F12 No Target
- By pressing the space bar, the nearest enemy will be targeted as Front Selection Enemies.
- SHIFT+P Animals (Zigs and mektoubs)
You can change your camera view distance by using the wheel on a mouse or using the keys shown in the Keys menu. Macros can use them too.
You can toggle to first-person viewpoint and back using the V key.
Some things are easier to see at different view distances, such as conversation bubbles or harvesting sources.
F1 key held down (F2, F3, F4) to customize the Desktop 1 (resp. 2, 3, 4)
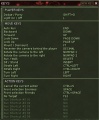
K key held down: change the shortcuts
We love your eyes
Not only out of greed :)
Do you have a small screen (13 inches) or are your eyes tired? This paragraph is for you
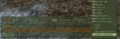
- From UI-Scale for all Clients JY 2602 patch, one of the big improvements is hidden in the System menu (System / Configuration / Graphics / General), with the interface scale - it goes from 0.80 to 2.00.
A big 1.50
Bigger at 1.05
Normal value at 1.00

Smaller at 0.95


- Also look at the size in the chat (System menu). This concerns the display size and not the size when entering.
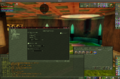
- Did you know you have four desks to organize your windows? Or that you can use many apps (chat, forum, webapps) outside the game, using a web browser or your smartphone ?
F1 with 2 Hands toolbars, opaque chat
F2 to craft: 3 I windows, chat on top


Avatar Gauges
In addition to the basic values, a small icon appears in the upper right corner. This is the player-versus-player (Faction PvP) status. If there is one sword, the avatar is not attackable by another avatar. If the player has changed the avatar's mode, it will be tagged as attackable by any homin enemy. The icon will show crossed-swords. Right-clicking and selecting any status will remove or add the display bar for it.


Faction (Kami/Kara) and 4 nations points, Marauder and Ranger, Reward Points (RRP)
Identity INFO: change title, write a biography (other players can read it)


Inventory
When clicking the second icon on the Task bar WINDOWS tab, an inventory window will appear. The basic window has two tabs, BAG and EQUIP. Bag is everything that you carry, while EQUIP is the jewellery and armour that you are wearing. If you buy a mektoub mount and packer, they will appear in their own tabs as MOUNT1 and PACK2. Also, if you have joined a guild that has an outpost, and you are near that outpost, a new tab will appear in the inventory. That will be GUILD and contain all the contents of the guild hall. You will also see the Guild tab when you are in the guildhall. In the same way, that will be ROOM with all the contents of your apartment, seen when in it (see below).

If you do not wish to lose your items accidentally, by destroying or trading them, select the right-click Lock/Unlock functions. It is recommended that you keep your most precious items, armour, and weapons locked.
- New (2017/08): text search in inventory, and group to move and ware armor easily (fast resume of 2 patches, links to forum).
- New (2019): TP don't take anymore any place in bag, new filter ?


Actions and Upgrades
Actions can be purchased from any of the trainers.
When learning an action, the complete set of root, options, and credits will be obtained in an icon. That icon can replace the previous version of a lower action. However, if an upgrade is purchased, particularly from a magic trainers, then only the option or only the credit will be purchased.
Each will drop an icon on the Task-bar that can be deleted.
One must then edit by selecting an action icon and right-clicking the Edit Action choice to open an edit window. There the individual option or credit “brick” can be updated to the newly learned upgrade by clicking on it. The icon name must also be manually changed to the updated version.
This will avoid confusion, because the trainer may still retain the complete action for that upgrade including credits that you might not have.
However, the price in skill points will change to reflect the value of only the "bricks" or "stanzas" that you do not yet own. It is not possible to "waste" skill points; once you have all "bricks" for a certain action, it will be removed from the trainer.
Pop-ups
Looting Window


After making a kill, an option will appear on the cursor when moused-overit. That message will either say Loot for a primitive or Quarter for a MOB. A small Quartered Materials window will appear with the booty from this kill which will vary each time. Individual items may be selected by clicking each item with the mouse, then selecting Drop All. The entire booty may be collected by clicking Take All. </div>

Warning Icons
Small warning icons will appear on the screen to alert you of any spell, catalyzer, or death penalty that affects you. A larger skull & crossbones image will appear if an owned mektoub dies. It will inform you how much time remains to collect your possessions from the mektoub before it decomposes. Hovering the mouse over the icon will give more information about the function and status of that icon.
Outpost Battle Window
When entering the area of a disputed outpost, a window will briefly open to alert the player to this situation. The player will either pick ATTACK, DEFEND. If neither is selected, the avatar will not be tagged, and remains neutral. Neutral observers cannot be attacked and cannot heal during battle. They must stay as neutral observers and may be asked to move if they affect things.
gallery
The new contact list
Identity Info
Writing your bio in Identity Info
Identity Advanced Stats: see nation and faction points, ranger/marauder, PvP points, Rewards points (RRP)

The Task-bar has now 4 themes, this is the smaller
On chat window, search to get the border then drag
If the border don't display, on the chat windows border, then try to unlock (image after)
Right clic on empy space (right of the last channel name) will open a menu to Unlock it
On USER Tab, on the free space after the last Tab right clic then unselect the channel to hide on USER tab. Save will backup your dynamic channels (under save, in channels_toonname.xml)

Use_the_map to update